
How to Install a GoDaddy SSL Certificate
Disclosure: Your support helps keep the site running! We earn a referral fee for some of the services we recommend on this page. Learn more
So you want to buy an SSL certificate, or move away from your host’s shared SSL certificate, but you’re intimidated by the prospect of having to install a certificate on your server. Don’t be. If you have CPanel/Web Host Manager (WHM) running on your server, installing a custom SSL certificate is actually very easy, and GoDaddy offers directions on how to do it. In just five steps, you can install your own custom SSL certificate.
A Quick Word About CPanel
Before you begin, note that CPanel does have the ability to create an SSL certificate without WHM, but it cannot actually install it on the server.Without root access to the server, CPanel cannot make edits necessary for Apache to enable the certificate. If your host only gives you CPanel (without access to the WHM backend), you will have to ask your host to install the certificate for you.
Step 1: Buy the Certificate
Buying an SSL certificate is pretty straightforward. Just visit GoDaddy’s SSL page to purchase the number of certificates you need. Note that while the site still lists the certificates at the original price, they ring up at the sale price when placed in your cart. You’ll need one SSL certificate per domain or subdomain, unless you obtain a certificate that allows multiple domains.
Step 2: Activate the SSL Credit
When you purchase an SSL certificate through GoDaddy, you don’t actually get an SSL certificate-you get a credit that enables you to create one. You then have to go to the SSL management page and click on “Use Credit.”

Then choose the certificate you want to use (you will most likely have only one).
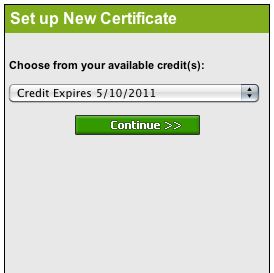
This will create a new, blank certificate on your server.
Step 3: Create a Certificate and Signing Request
Next, log in to your WHM backend and create a certificate and signing request (CSR). To do this, go to the Web SSL/TLS menu in your WHM and click on “Generate an SSL Certificate and Signing Request.”
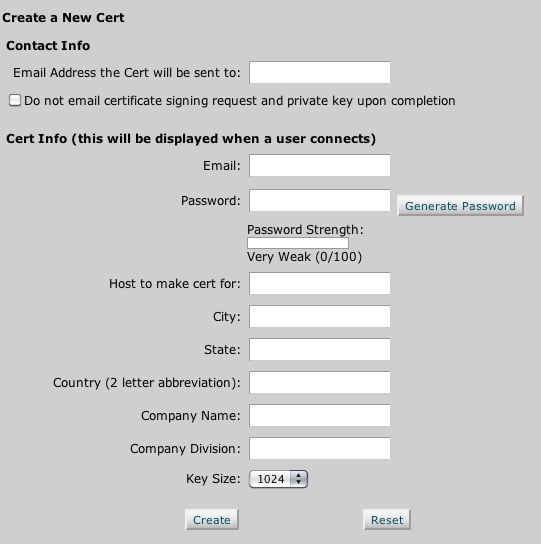
Fill in the information for your certificate (email address, password, company name, etc.). Be careful to ensure the key size is set to 2048, or GoDaddy will not accept the CSR.
Once you click “Create,” your server will create three strings of random text, the signing request, the certificate, and a key. Save the key to a backup text file and copy your signing request, including the beginning and ending lines, and log back into GoDaddy’s certificate management screen.
Locate the blank certificate you wish to use with this site and click on “Manage Certificate.”

Inside your certificate, find the field requesting your CSR and paste it in. GoDaddy will automatically fill in much of the certificate’s data for you. Click “Create Certificate,” and GoDaddy will begin verifying the domain and generating the certificate. (Please note, if your email address associated with the domain is different from the one associated with the certificate, you will have to authorize the certificate setup for it to complete successfully.) Once your certificate is done, you can move back into applying it to your account.
Step 4: Applying Your Certificate
Once your certificate has been generated, download it to your computer by clicking the “Download” button.

Next, extract the .zip file you just downloaded and, using Notepad or an equivalent text editor, open the .crt file. Copy its entire contents, then log into your WHM. Under “SSL Management,” click “Install an SSL Certificate and Set up the Domain.” Paste the contents of the .crt file into the box below “Install an SSL Cert.”
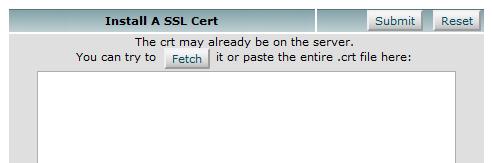
Once this step is complete, the other fields on the page should populate automatically, and you can hit “Submit.” If everything is in order, the server should accept the certificate and restart Apache. Certificate installation should now be complete.
Step 5: Testing
Don’t break out the champagne just yet. The certificate installation is complete, but a it’s a good idea to perform a quick test to ensure everything works properly. Visit the homepage of the site for which you installed the certificate, changing the “http” to “https.” If your certificate installed properly, you should receive no security errors, and the URL should now look like this:
Don’t worry if a security error appears. Simply wait a few minutes, clear your browser’s cache, and try again. It can take a few moments for your browser to recognize that the certificate has changed. Once the certificate loads without errors, click the lock icon in your URL bar and read the information provided by your new certificate to make sure it’s correct. If everything seems to be in order, congratulations—you’re finished!
Given that the current price for a proper SSL certificate is about a dollar per month, the potential return on investment makes installing one a smart bet for anyone seeking to improve their site’s security and user experience. If your site requires users to submit credentials (even those as simple as a username and password for a forum), or if your site features a store (with or without an offsite payment processor), an SSL certificate can quickly pay for itself by providing increased traffic and greater peace of mind for your users, and for you.
Keep up with posts like this by subscribing to our RSS feed, or following @WhoIsHosting on Twitter.


Comments