
Launching Your First Blog: The “How To” Guide
Disclosure: Your support helps keep the site running! We earn a referral fee for some of the services we recommend on this page. Learn more

So you want to start your first blog, and you want to do it fast. This guide will show you how. You’ll learn how to choose a cheap web hosting account, grab your dream domain and get WordPress up and running in an hour.
It’s fast and easy, and you’ll enjoy having complete control over your own WordPress blog.
Step 1. Get Cheap Hosting
WordPress itself is completely free. To create a website using WordPress, you need a web hosting account. Your web host stores the WordPress files on their server and ensures your site is available round the clock. All you have to do is choose the right host.
WordPress works great on practically any budget hosting package. Most new users start with a cheap shared hosting package costing a few bucks a month. “Shared” means the web host places multiple clients on the same server, which is an economical way of providing resources for small websites.
Choosing the Best Shared Hosting
The cheapest shared hosting is offered on the Linux platform. Luckily, that’s what WordPress runs on too. You don’t need to worry about the operating system you’re running on your own computer, because Linux hosting can be managed from any computer with an internet connection. Just make sure that your host supports WordPress. We suggest HostGator.

Even though it’s called shared hosting, you will be allocated your own server space and resources. Web hosts are committed to ensuring it’s secure. Shared hosting is often marketed as “unlimited,” but the host will still expect your usage to be within certain limits.
Check that your hosting plan allows you to:
- Install WordPress (It’s hard to find one that doesn’t!)
- Set up email accounts linked to your domain
- Access your files via FTP software (Like Panic Transmit)
- Move away without penalty, or upgrade, if you outgrow the hosting plan
HostGator is a good example of a cheap host that’s built to run WordPress. It offers all of the features you’ll likely need: email accounts, forwarding, FTP and more for $3.40/mo. There’s no need to sign up for a long-term contract, and there’s plenty of WordPress help for new customers in the Help Center.

Choosing a Great Domain Name
You’ll also need to buy a domain name for your website. This is the URL your visitors type in to visit your site. (Our domain name is WhoIsHostingThis.com.)
Choosing the right domain name can be a challenge, mostly because many of the good ones are long gone!
We suggest you:
- Go for a short, snappy word — or your name, if it’s a personal site. Does it pass the radio test?
- Avoid domains with lots of keywords, and don’t use hyphens in the domain name.
- Aim for a .com, or a localized domain, like .co.uk.
- Check that your domain isn’t a registered trademark.
- Use KnowEm.com to check availability on social media services like Twitter.
The good news: HostGator offer a special low price for domain names for WhoIsHostingThis.com visitors.
If you want to buy more domains, take a look at GoDaddy, the world’s most popular domain registrar. However, many webmasters (Including us!) dislike the interface and aggressive upselling.
We use Uniregistry. The interface is super-simple to use, and they have many of the new GTLDs domains (like .ninja or .rocks) cheaper than anybody else. Best of all: there’s no constant upsells!
If you find the domain you want has already been registered, you may still be able to buy it. In fact, we did just that with this domain, WhoIsHostingThis.com!
Domain marketplaces sell “aftermarket” domains from $50 right up to many millions of dollars. The most popular domain marketplace is Sedo, who we’ve bought and sold many dozens of domains with over the years.
Other major marketplaces for domains include SnapNames and NameJet.
Step 2. Install WordPress
Now you have your shared hosting account, you can install WordPress. There are two ways to do it.
Whichever method you choose, you will be up and running within an hour.
Option A: The Super-Easy Method
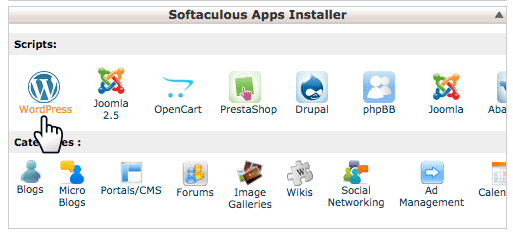
Hosting companies like HostGator offer WordPress as a One Click Install. In your web hosting control panel, you simply use a Wizard to install the application on your account. Using the One Click method, your blog will be fully functioning within 10 minutes.
The downside of the One Click Installer is that it’s slightly less customizable then the second method we’ll show you. If you prefer to learn as you go, keep reading.
Option B: the 5-Minute Method (*Cough*)
The second option is a self-install. WordPress claim that it takes 5 minutes. It’s not difficult, but it takes slightly longer than five minutes. (For us, at least!)
You’ll have to use this method if your host doesn’t offer a One Click Installer. But relax — it’s still dead easy.
To install WordPress in 5 minutes:
- Download a File Transfer Protocol (FTP) client application. FileZilla and Cyberduck are great.
- In your browser, log in to your hosting control panel and create a new MySQL database. Make a note of the database name, username, and password — including any text before the underscore (which may be added automatically).
- Visit WordPress.org and download the installer zip file.
- Unzip the file on your local computer.
- Connect to your web hosting account using the FTP login your host provided.
- Upload all of the unzipped files to the public_html folder, or the www folder if you don’t see public_html.
- Visit your website at the domain name URL.
- Follow the instructions to complete the installation!
At the end of the installation, you’ll be asked to log into WordPress to configure the application. Keep reading to find out what tweaks you need to make.
Step 3. WordPress Setup
Now your blog is up and running, it’s time to customize the settings so everything works the way you want it to.
But first, a sensible precaution: rename the default user. This makes your blog more secure. In the sidebar, select Users -> Your Profile and change the details to something unique to you.
- First, switch on Permalinks. This setting gives your blog readable URLs that may give your site an SEO boost. Navigate to Settings -> Permalinks, select the Post name option and save. If you want to use a Custom Structure here, be sure to avoid numbers and punctuation, such as underscores.
- Discussion Settings are next. These settings control how comments are handled. If you don’t have a blog on your site, you should disable comments completely. If you have a blog, leave Allow people to post comments on new articles. Customize the settings as you prefer.

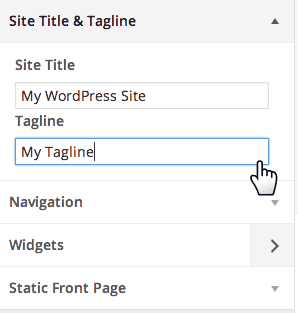
- Reading Settings tell WordPress how your blog should be displayed. You can choose one of your pages as a static front page, or display your latest blog posts on the home page instead.

- In the Reading settings, you will also see a Search Engine Visibility checkbox. While you’re working on your site, you can check this box to hide your blog from search engines. Set yourself a reminder to uncheck this box when you’re ready for launch.

- Change the default image storage folder in WordPress. This will make your blog more secure. First, use your FTP software to create a new folder in wp_content called images. Then, in WordPress’ Settings section, look for the Miscellaneous page. Under Store uploads in this folder, point WordPress to images, rather than the default, uploads.


Step 4. Choose a WordPress Theme
WordPress is a template system. The website content, such as the blog posts and static pages, are stored in a database. The site layout and color scheme is stored separately in a template.
You can choose any theme from tens of thousands. What’s more, you can change templates whenever you like, and make your site look totally different.
Free Themes vs Premium Themes
WordPress developers often distribute free themes. They also create templates that users pay for: premium themes.
So why would anyone buy a theme when there are free options?
Here are a few reasons to go premium:
- Free themes may be used by dozens of websites. Premium themes are less commonly used, so there’s less chance of a competitor launching a site that looks exactly the same as yours.
- Developers who distribute free themes don’t usually offer extended support. With a premium theme, you will usually have direct contact for the developer.
- Premium themes may include more advanced features and sometimes come bundled with premium plugins.
Our favorite marketplace for premium themes is ThemeForest. They have thousands starting at around $10 — although many of the best themes run $30-$50.
Other popular premium themes you’ll see often in the wild are:
It’s a matter of personal taste: what looks good to you. If you don’t want to spend the extra money, simply try a free theme first and, once your site is bringing in traffic, consider an upgrade to a premium theme.
Customizing Your Theme
WordPress has a built-in theme editor that’s What-You-See-Is-What-You-Get (WYSIWYG). As you edit the theme, the changes are reflected in a real time preview. It’s easy to tweak themes to get them how you want them.
In the WordPress admin area, navigate to Appearance, then Customize. The drop-down lists on the left hand side will display the customization options available to you.
The theme editor is designed for small tweaks rather than big layout changes. If you want to customize your theme extensively, you’ll need to dive into the code or hire a professional.
Need some help making WordPress do something a little fancier? We use and recommend Elto. It’s a marketplace where geeks bid on small projects. For example, “Update my WordPress theme.” Or, “Fix my broken WP plugin”. Projects start around $30.
Step 5. Add WordPress Plugins
With WordPress plugins, you can further extend your blog’s functions until it fits your requirements perfectly. It’s easy to install plugins from the WordPress admin area (found at http://yoursite/wp-admin).
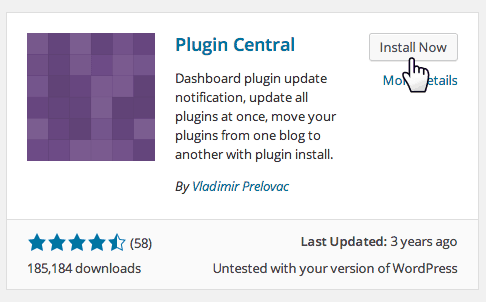
We recommend that you install the Plugin Central first. It allows you to quickly install plugins via the official WordPress plugin site.
What other plugins should you install? Here’s a few of our favorites:
- Encourage users to subscribe to your newsletter with Aweber and their subscription form. It’s really easy. Just setup an account at aweber.com and grab the Aweber plugin.
- Akismet is an awesome spam-catcher that will prevent spam from littering your blog comments. It uses a sophisticated detection method to filter out comment spam for manual review. You need a key to use it, but these are freely available from Akismet.com.
- Yoast SEO is another free plugin, and an essential extension to WordPress. Yoast SEO adds features and fields that give your blog an SEO boost. It makes the whole WordPress application smarter, and helps you to understand how to write more optimized content, titles. and descriptions. Search and install from the Plugins page.
- Make it easy for visitors to email you by adding a contact form. Contact Form 7 is a free, easy to use contact form plugin. Explore it at http://ContactForm7.com.
- W3 Total Cache helps to speed up WordPress by caching some of your most frequently accessed content. It can be installed in seconds through the Plugins page.
- The DiggDigg plugin adds social sharing buttons to every blog post you write. See the buttons on the right of this page? That’s the idea.
Looking for a plugin to do something more specific? If the official WordPress.org site can’t help, we recommend a site called CodeCanyon.
CodeCanyon has hundreds of specialist WordPress plugins from around $10. You’ll find plugins to add anything you can think of, from fancy forms to newsletter tools.
Again, Elto can help you find geeks to undertake small projects.
Step 6. Create Your Blog Content
Now it’s time to add content to your new WordPress website. Initially, there are two types of content to write: Posts and Pages.
Here’s how to tell them apart:
- A Page is a static page. Examples include your About page, information about your products or services, and your Home page. Pages are designed to be evergreen: they always exist prominently on your website as a “shop front.” If you are planning to run a personal site, you may just have one or two static pages
- A Post is a blog post. Blog posts are time stamped, and readers are often invited to comment on them or share them on social media
Work on writing your Pages first so that the site structure and navigation is in place. You can then work on your Posts, building a rolling sequence of updates that are published over time.
How to Blog
There are no strict rules on how to blog, or what to blog about. Your first post can be on any topic that you feel comfortable writing about. However, bear in mind that search engines like to see good quality content. Aim to publish interesting, informative posts that will hook in your readers and get them coming back for more.
Use our blogging tips to guide your first post:
- When structuring the title of a blog post, make sure you include keywords. They will be carried over to the URL that WordPress generates for the post, and both will help with SEO.
- Upload one image using the Featured Image box in the Post composition screen. This image will appear next to the post in WordPress and on some social media websites. Images make blog posts much more engaging.

- Set up at least one category, and ideally two or three. Use tags to describe themes in your blog.
- Use the WordPress editor to add headings to your post. Use Heading 2 primarily; sub headings should be assigned Heading 3, Heading 4 and so on.
- Don’t try to trick Google by using excessive keywords in your content. This may have worked in the late 90s, but Google is now much smarter at penalizing sites for it.
- Blogging is exciting, but if you’re not much of a writer, it may be difficult to maintain a strict blogging schedule. If you have a budget set aside, hire a professional writer to supplement your blog posts with additional content.

And that’s it! Enjoy blogging with WordPress. Don’t forget to untick the “Search Engine Visibility” checkbox once your site is ready for its first visitors.


Comments